Cloudmaster provides an application to monitor and scale your EC2-based servers based on their load.
By Charles Hayden (Amazon Web Services provides components that can be put together in many ways to make useful services. These components provide several abstractions: pure storage (S3), pure computation without persistent storage (EC2), and reliable messaging (SQS). While each of these services can be used individually, many applications involve a combination of interacting services, managed by a controller. This note describes such a controller, called CloudMaster, and shows how it can be configured to manage several different kinds of distributed applications.
The principal responsibilities of a controller are to monitor the flow of work handled by the application, and to
CloudMaster provides a flexible framework, on which specific start/stop policies, status tracking, and reporting policies have been implemented. You can use these pre-defined modules to control your application without any programming, or you can augment or replace one or more of these modules to customize the controller operation.
For instance, different applications have different the policies governing how, when, and by how much to adjust the number of servers required. CloudMaster provides several policy modules corresponding to different common design patterns, but it also provides a pluggable interface that makes it easy to provide custom policies.
In the same way, there are modules for common ways of reporting server health and status, but you can supply your own. And there are modules for reporting the application status, which can be augmented if needed. The idea is to make it easy (through configuration file changes only) to support simple applications, but to make it possible to support more complex applications too.
The CloudMaster framework provides the following services:
CloudMaster uses ideas described in the Monster Muck article and is based on ideas in Lifeguard, which is an earlier AWS distributed application controller. It differs from lifeguard mainly by providing pluggable interfaces for policies, status, and reporting functions.
The source code for CloudMaster, the example images, and detailed instructions on how to run the examples, can be found at http://code.google.com/p/cloudmaster.
CloudMaster normally runs on your computer, not on an Amazon Instance, although this is certainly possible. It is designed so that if it is stopped, the application is controls can continue normally, although the pool will no longer be managed. When CloudMaster is started, it takes over any instances that are already running, so that it can be freely started and stopped with little visible effect.
The operation of CloudMaster is controlled through a configuration file (or set of files). These files contain, for instance, your AWS credentials, number of pools, and the EC2 image and policy associated with each pool. For each pool, the policy may have its own set of settings.
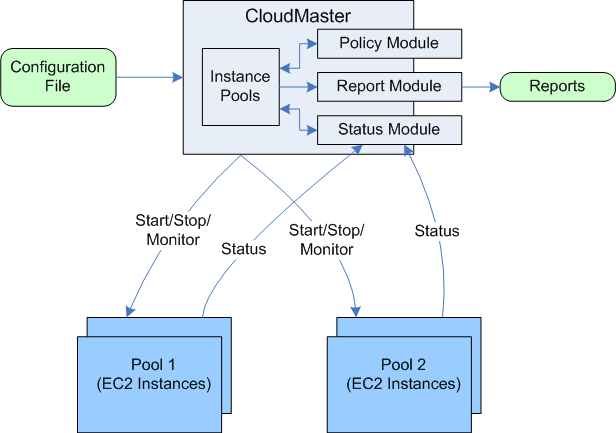
The following figure shows CloudMaster and two pools of managed instances.
Figure 1 -- CloudMaster Overall Configuration
Managed instances report status to CloudMaster. Based on the configured pool policy, the instance pool may be expanded by starting new instances or reduced by stopping instances. If an instance stops sending status messages altogether, the policy can kill it and start another in its place.
The status module is used to interpret status messages, which allows you to tailor it to any existing instances you may already have. In particular, a status module is supplied that understands the status messages that lifeguard uses.
CloudMaster report modules allow it to send reports through a SQS queue, a S3 object, and/or by syslog or standard output.
CloudMaster comes packages with several standard policy modules. The simplest is the Fixed Policy, which monitors the number of instances and ensures that it stays between a configured maximum and minimum. If these are set to the same value, it ensures that there are exactly this many instances running at all times. This is useful because instances can crash unexpectedly, or they can be started or stopped inadvertently by other agents using the AWS service APIs. In addition, if an instance does not send a regular status message of some kind (the interval is configurable) then CloudMaster stops it and starts another in its place.
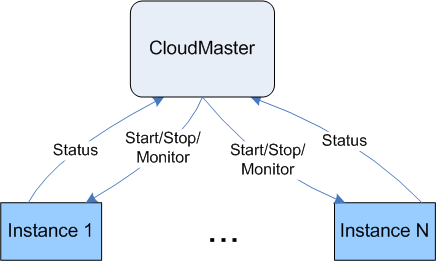
Figure 2 -- Fixed Pool
A common architecture for distributed applications is a pool of identical stateless servers reading from a work queue. The Monster Muck Transcoder and the Lifeguard OCR application are examples of this design pattern. The SQS queue is ideal for realizing this kind of application. Work is fed to the queue by some external entity, and is picked up by an idle instance. Because SQS queues cannot transfer much data, S3 is often used as the place to store the input and the output of the worker, but this is not important here.
Beause work is fed as a sequence of independent jobs to the pool, this kind of service is called a job server.
Figure 3 shows one such instance pool, with its associated work queue and status queue.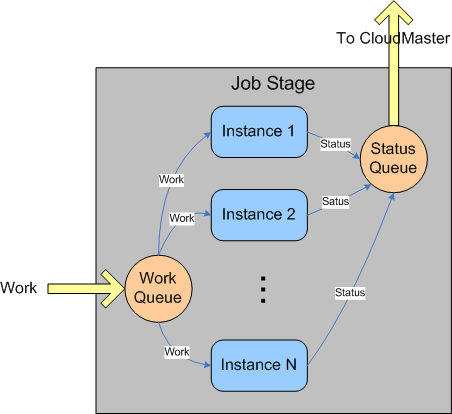
Figure 3 -- Job Stage
The completion of a job is often signaled by sending a message to another queue, which allows job servers to be chained together, as shown in Figure 4.
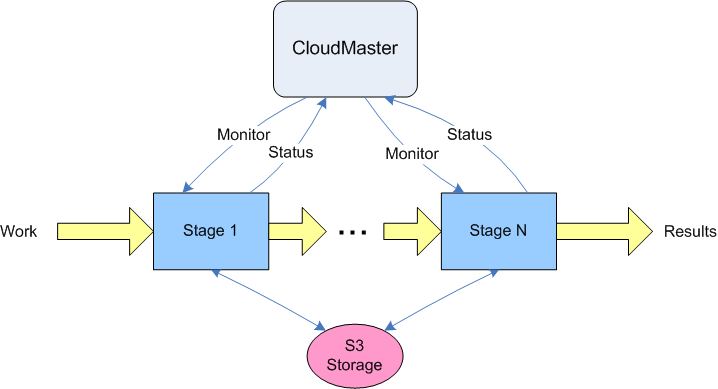
Figure 4 -- Example Job Pipeline
CloudMaster uses the Job Policy to manage each stage of the job pipeline as a separate pool. Each instance sends a busy status report when it starts working, and sends an idle status report when it finishes. The job policy monitors the backlog in the work queue as well as the busy/idle status of each instance. If the backlog grows beyond a configurable upper bound, new instances are started. If the backlog is below a lower bound, and if a suitable fraction of the instances are idle, then some of them are stopped.
CloudMaster can handle any number of pools independently, so it could manage the example of Figure 4 by adjusting the number of instances in each pool to ensure a smooth flow of work through each stage. If a bottleneck develops because the processing at one stage is slow, the number of instances is adjusted upward to compensate. And if the work flowing into the system increases or decreases, the instances all along the pipeline are adjusted to accommodate the change.
The final built-in policy described here is the Resource Policy. It is given this name because each instance provides some resource, which clients use on an ongoing basis. Instead of being stateless and interchangeable, as the instances were in the job process, each instance services a particular set of clients, and each client knows how to contact the particular instance serving it.
A typical example of this kind of serve is a media server, in which clients connect in order to receive an audio or video stream. Each instance can serve some number of streams simultaneously; when the number of clients grows beyond that, another server must be allocated. Clients connect when they need to receive media, and disconnect when the media stream ends. As before, instances typically rely on S3 for access to persistent storage, but this is not important and is not shown here. So the media servers would get the data from S3, so they are effectively equivalent (a client can be assigned to any server).
The resource server pattern is shown in Figure 5.
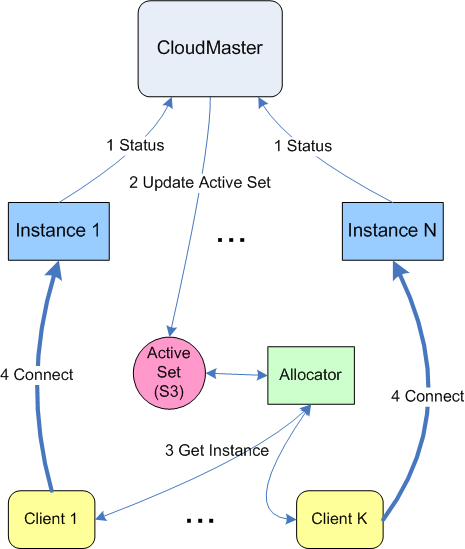
Figure 5 -- Resource Pool
In addition to CloudMaster and the instances, this shows an Active Set and an Allocator. The active set is one kind of report that can be produced by CloudMaster. It is stored in S3 and consists of a list of the active instances, along with their DNS names and estimated loads. The allocator is a software component, which can run at any location in the network. The job of the allocator is to choose one instance to serve a given client.
When the client needs to connect to a resource, it calls upon the allocator, which refers to the active set, typically picking the active instance with the lowest load. It returns the DNS name of the selected server, which the client then uses to make the connection.
Each instance periodically reports its estimated load, which can be as simple as he ratio of the number of connections to the maximum number of connections allowed. The estimated load should be zero when there are no connections, and should rise as the actual load increases, but otherwise can be defined freely by the application.
The resource policy has configurable lower and upper load targets, within which it attempts to keep the instances. If the load in3every instance exceeds the threshold, then another instance is created. Since its load is initially zero, new clients will be connected to this instance. If the load of an instance drops below the minimum threshold, the resource policy tries to determine if the other servers have the capacity to serve additional clients. If so, then one of the instances can be deactivated.
Removing a server from the pool is not as simple as just stopping it: it still has some clients, who would be disrupted by a sudden shutdown. So CloudMaster marks the instance as shutting down, and removes it from the active set, but does not stop it. The allocator no longer assigns clients to this instance, and existing clients gradually dwindle. When the load reaches a given idle threshold (normally zero) or after a configurable time has elapsed, the instance is finally stopped.
If, during the time a server is shutting down the load increases, then CloudMaster makes it active once again, rather than starting a new instance. It can do this simply by restoring the instance to the active set.
To illustrate how simple it is to configure and run CloudMaster, we show how to run the sample servers that come with CloudMaster. The project is set up for Linux, and requires that ruby 1.8 be installed. Download the project from http://code.google.com/p/cloudmaster. You should set AWS_HOME to point to the cloudmaster directory you just created.
A Primes server follows the job model: it reads a number from a queue, generates that number of primes, and reports the last one generated in a status message. By filling the queue faster than the primes instance can empty it, you can observe CloudMaster create several primes instances. A Fibonacci server follows the resource model: a client connects to an allocated Fibonacci server, and each time it sends a newline character over the connection, it receives the next value of the Fibonacci sequence. By creating enough clients, you can observe CloudMaster create instances of Fibonacci servers.
First, you need to set up your access key, secret key, and other settings needed by CloudMaster. You should have the access key and secret keys from when you signed up for AWS. The keypair stored in the pem file is required for secure access to EC2, and you should supply the path to it in aws_key. Finally, you need to supply a bucket to store reports.
This all goes in aws-config.ini in your home directory.
[AWS]
aws_access_key='YOUR-AWS-ACCESS-KEY'
aws_secret_key='YOUR-AWS-SECRET-KEY'
aws_user=cloudmaster
aws_bucket=your-bucket
aws_key=$HOME/keys/your-kp.pem
Next, configure the two instance pools. This all goes in config.ini in your home directory.
[Pool-primes]This configures two pools, names primes and fib. The primes pool uses the job policy, and the fib pool uses the resource policy. The name of the amazon machine image (ami_name) is given for the Fibonacci server, since it differs from the default. The names here are public images that implement the primes and Fibonacci servers. In the case of primes, the default parameters (such as the queue threshold for increasing the pool, then names of the work and status queues, etc) are appropriate, and can be omitted. For the fib pool, the active_set_type setting causes it to write an active set in S3, and the queue_load_factor determines how many instances to create initially, based on the number of new requests. By default, it will store the active set in the S3 bucket that you specified in aws_bucket.
policy=job
[Pool-fib]
policy=resource
ami_name=cloudmaster-ami-fibonacci
active_set_type=s3
queue_load_factor=10
Now start CloudMaster.
cd $AWS_HOME
run-cloudmaster
Once it starts, you see it report in its idle state.
Jul 14 21:47:09 08 primes Instances: 0 Queue Depth: 0
Jul 14 21:47:09 08 primes ---Instance Summary---
Jul 14 21:47:09 08 primes ----------------------
Jul 14 21:47:09 08 fib Instances: 0 Queue Depth: 0
Jul 14 21:47:09 08 fib ---Instance Summary---
Jul 14 21:47:09 08 fib ----------------------
Jul 14 21:47:16 08 primes Instances: 0 Queue Depth: 0
Jul 14 21:47:17 08 fib Instances: 0 Queue Depth: 0
Jul 14 21:47:21 08 primes Instances: 0 Queue Depth: 0
Jul 14 21:47:26 08 fib Instances: 0 Queue Depth: 0
Jul 14 21:47:27 08 primes Instances: 0 Queue Depth: 0
Next, generate some work for the primes server.
$ cd $AWS_HOME/examples/primes
$ feed-primes-queue
sent 1|6573
CloudMaster responds, first, by noting the queue work request, then when policies are evaluated, by creating an instance to service the work. Later, when the instance has started, we can see that the work has been processed, the queue entry deleted, and the answer returned to the CloudMaster log.
Jul 14 20:00:50 08 primes Instances: 0 Queue Depth: 1
Jul 14 20:00:57 08 primes Instances: 0 Queue Depth: 1
Jul 14 20:00:57 08 primes ---Instance Summary---
Jul 14 20:00:57 08 primes ----------------------
Jul 14 20:00:58 08 primes Started instance i-ceeb38a7
Jul 14 20:01:05 08 primes Instances: 1 Queue Depth: 1
. . .
Jul 14 20:01:57 08 primes Instances: 1 Queue Depth: 1
Jul 14 20:01:57 08 primes ---Instance Summary---
Jul 14 20:01:57 08 primes  i-ceeb38a7 State: startup Load: 0.00 Since Last Report: 59
Jul 14 20:01:57 08 primes ----------------------
Jul 14 20:02:03 08 primes Instances: 1 Queue Depth: 1
. . .
Jul 14 20:02:25 08 primes Instances: 1 Queue Depth: 1
Jul 14 20:02:32 08 primes i-ceeb38a7 Processing: 1 6573
Jul 14 20:02:35 08 primes i-ceeb38a7 Processed: 1 6573 primes (65809) in 2
Jul 14 20:02:39 08 primes Instances: 1 Queue Depth: 0
. . .
Jul 14 20:03:02 08 primes Instances: 1 Queue Depth: 0
Jul 14 20:03:02 08 primes ---Instance Summary---
Jul 14 20:03:02 08 primes i-ceeb38a7State: active Load: 0.00 Since Last Report: 29

Jul 14 20:03:02 08 primes ----------------------
Next, we create some work for the Fibonacci server.
$ cd $AWS_HOME/examples/Fibonacci
$ run-client
no servers are running, try again in a minute
Jul 14 20:46:53 08 fib Instances: 0 Queue Depth: 1
Jul 14 08 fib ---Instance Summary---
Jul 14 08 fib ----------------------
Jul 14 20:46:56 08 fib Started instance i-2fe83b46
Jul 14 20:47:03 08 fib Instances: 1 Queue Depth: 0
. . .
Jul 14 20:49:00 08 fib ---Instance Summary---
Jul 14 20:49:00 08 fib i-2fe83b46 State: active Load: 0.00 Since Last Report: 52
Jul 14 20:49:00 08 fib ----------------------
This time, the client finds a server, and starts producing Fibonacci numbers.
$ run-client
1
2
3
5
8
13
. . .
Charles Hayden is a software development engineer with Microsoft, working on Live Messenger. He has extensive experience in open source technologies with New York Times Digital, Avaya, Lucent, and AT&T Bell Laboratories. You can contact him at cchayden@gmail.com.