Set Up Your Own IP-PBX

Note: I know this is seriously out of date. I have not been able to update it, and I don't expect that to change for the forseeable future. Still, many people continue to find it useful, so I will keep the page around for a while longer. I cannot provide help or answer questions on it, however.
The state of open source software has progressed to the point where you can set up your own IP PBX at home in a single evening, with a minimum of investment needed. All you need is explicit instructions, which is what I provide here.
In past times, it would have been quite costly to have a “personal” PBX. Using spare hardware, open source software, and low-cost service providers, it can now be done for almost nothing. The key advance is the open source Asterisk IP PBX and the Asterisk@Home package that includes Asterisk and a web-based GUI configuration tool.
The Components
Your will have to set up three main components: the IP PBX itself, the phones (or softphones) to be used with it, and the gateway service that lets you call other people on the PSTN. I will describe how to set up each of these. I assume you already have a home network and broadband access. If you are behind a NAT firewall, it does not matter – you don’t have to do anything special like running the IP PBX outside the NAT. All that matters is that you have enough bandwidth (upstream and downstream) to carry voice traffic.
The IP PBX
You will need a computer to run the IP PBX. While you may already have a Linux server at home, I do not recommend using it to also run your phones. If you want to do that, you will have to figure out how to load and configure the PBX software on your own, although the rest of the instructions here will be helpful.
If you have an old PIII class machine lying around, then use that. If not, you can buy one on EBay for about $40.
I used a Dell OptiPlex GX1, a PIII 450MHz system with 128M RAM. It has a built-in sound and Ethernet, so no additional hardware is required.
You will load Asterisk@Home on this computer. It will take it over – it starts by formatting the hard disk, so make sure there is nothing on the machine that you want to keep. Detailed instructions are given below.
Phones
You can buy SIP phones from Grandstream, SNOM, Cisco, even Avaya. Or you can buy an adapter from SNOM or Cisco and use an analog phone. To get started, though, it is easiest to get a softphone and run it on another computer. We will describe how to obtain and install the XLite softphone on a Windows machine to use for a phone. You will also use this Windows machine to administer the IP PBX, through a browser. If you want to use a Linux machine instead, you will need to get an appropriate softphone for it, but you can still use its browser to administer the IP PBX.
SIP Gateway
I presume you want to communicate with others on the PSTN network, so you need to obtain gateway service. Since part of the call is being carried on the circuit switched network, it costs real money. This means you will have to pay for this part of the system.
I will describe how to set up access to two services, one for outgoing calls and another for incoming calls.
VoipJet is used for outgoing calls. It is priced at 1.3 cents
per minute (
BroadVoice is used for incoming calls. You get a phone number (you can choose the area code and exchange). They have various plans, but I signed up for one that is $5.95 per month, with unlimited incoming minutes. You can also make outgoing calls using this account (it includes 100 minutes per month, and 3.9 cents per minute additional). There is a $9.95 one time activation fee to sign up for BroadVoice.
So if you have the hardware, you can set up your IP PBX for a total of $9.95 and run it for $5.95 per month.
Home Network
I assume you have a home network, and that you are setting up behind a Gateway Router (otherwise known as a NAT firewall). You will need to pick a static IP address for your IP PBX that is on your home network.
How Much Will This Cost?
I assume you have broadband service, a router, and a Windows machine to run the softphone.
If you already have a spare computer that you can dedicate to this project, there is no cost at all for equipment, unless you need to buy an audio headset for the softphone. If you do not have a spare computer, then you can buy one on EBay for about $60, including shipping. This does not include a monitor, but you don’t need a monitor except briefly when you first set it up. I assume you can borrow a monitor (or that you have a KVM switch).
Your only other initial cost will be the $9.95 activation fee to BroadVoice.
Your monthly cost will be $5.95 for incoming service from BroadVoice, and 1.3 cents per minute for outgoing calls to VoipJet. If you only make a few outgoing calls, you could drop VoipJet, and stay within the 100 outgoing minutes that you get from BroadVoice. If, say, you use 100 minutes of VoipJet outgoing calls, it would cost an additional $1.30.
So you can build and experiment with your own IP PBX for an investment of less than $100, and for an ongoing cost of less than $100 per year. This is a lot less than I am now paying for my phone service from AT&T. In fact, a whole year’s service would be less than my monthly phone bill. Hmmm…
Step 1 – Sign Up for Service
This section takes you through signing up with VoipJet and BroadVoice. I am using two service because
- it is less costly, if you use it a lot, and
- it illustrates how to set up two different kinds of trunks.
VoipJet

Browse to http://www.voipjet.com. Sine up for service. Then log on and follow the line describing how to set up Asterisk. You will need to copy down your “VoipJet account number (username),” your “Authorization code (password),” and your server IP address (depending on your location). Ignore the rest of the setup instructions.
BroadVoice
 Browse
to http://broadvoice.com. Sign up.
Say “I want to use my own SIP device”.
When it asks what type of device, select “Not Listed
(Generic SIP). When
it asks for details, just say
“Asterisk”. Next,
pick your phone
number. Next pick
your plan. I
recommend “BroadVoice BYOD Lite.”
Once you have finished the sign up process,
log in, click on “Account” and follow the “Show Settings” link in the
“Your
Devices” section. This
section gives
your phone number (in case you forget) and your password (you will need
this
later).
Browse
to http://broadvoice.com. Sign up.
Say “I want to use my own SIP device”.
When it asks what type of device, select “Not Listed
(Generic SIP). When
it asks for details, just say
“Asterisk”. Next,
pick your phone
number. Next pick
your plan. I
recommend “BroadVoice BYOD Lite.”
Once you have finished the sign up process,
log in, click on “Account” and follow the “Show Settings” link in the
“Your
Devices” section. This
section gives
your phone number (in case you forget) and your password (you will need
this
later).
You should also click on the “
Detailed Instructions
1. Ping the following hosts: proxy.lax.broadvoice.com, proxy.dca.broadvoice.com, and proxy.mia.broadvoice.com.
2. Pick the one with the lowest latency. In my case, it was proxy.dca.broadvoice.com.
3. Use nslookup to get the IP address of proxy.dca.broadvoice.com. In my case it is 147.135.0.128.
Step 2 – Set Up Home Network
Pick an IP address for the IP PBX. You will need to find an unused address on your subnet outside the range assigned by your DHCP server. I picked 192.168.0.40. If you pick a different IP address, you will have to adjust the instructions accordingly.
Step 3 – Set Up SIP Softphone
 Download
and install XLite from http://xten.com.
Download
and install XLite from http://xten.com.
Run XLite. Click on the “Menu” icon to configure it. Click on “System Settings”, then “SIP Proxy”, then “Default”.
Fill in the following fields:
|
User
name: 200 |
It should look something like this.
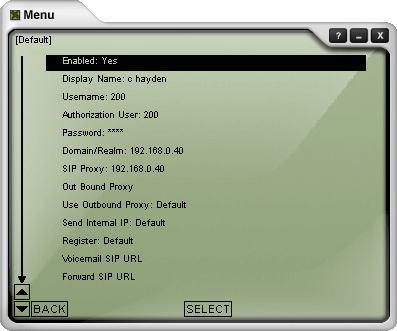
The phone will try to register, but for now it will fail.
Step 4 – Set Up Asterisk@Home
![]() The
rest of the instructions explain how to install and configure
Asterisk@Home. From
here on, I will
refer to it as AAH.
The
rest of the instructions explain how to install and configure
Asterisk@Home. From
here on, I will
refer to it as AAH.
Introduction
AAH is a package consisting of several major components. These were developed and supported relatively independently. The “Asterisk” part is the core IP PBX, and the “@Home” part consists of applications, a provisioning system, an installer, and an operating system that, together, make a complete package. The major components that make up AAH are
- Asterisk, the core PBX
- Sugar, a CRM system
- Flash Operator Panel, a screen-based operator’s console
- Web Meet Me Control, a meet me conferencing control application
- Asterisk Management Portal (AMP), a web-based provisioning tool for Asterisk
- A report system, part of AMP, which provides CDR reporting tools
- A Maintenance system, also part of AMP, which provides low level interfaces to some components and real time system information
- CentOS, a version of Linux related to from Red Hat Enterprise Linux (but without Red Hat branding and support).
Get the Software
AAH can be downloaded from http://asteriskathome.sourceforge.net. Download the basic ISO file, and burn it to a CD as a bootable volume (exercise left to reader).
Load AAH
This is
going to
reformat your hard disk and load everything from the operating system
on up, so
make sure there is nothing on the hard drive that you want to save.
Boot your machine from the CD. When it prompts, type ENTER. Then wait as everything loads and compiles. This could take 30 minutes or more, depending on how fast your computer, hard drive, and CDROM are. At the end, it ejects the CD and reboots from the hard drive.
The initial login is:
|
username: root password: password |
Set Up Networking
The machine probably got an IP address from DHCP, but it is not what you want. Log in as root and run:
|
netconfig |
It will display setup information. You should enter the following:
|
IP address: 192.168.0.40 Netmask: 255.255.255.0 Gateway: 192.168.0.1 DNS Server: 192.168.0.1 |
OK these changes, then reboot the machine to make them take effect.
After reboot, long in once more. You need to add the BroadVoice server IP address to /etc/hosts.
Edit /etc/hosts, and add the following line at the end:
|
sip.broadvoice.com
147.135.0.128 |
Here the IP address was the one obtained when signing up with BroadVoice.
Once this is done, you can do the rest of the configuration through the web.
Browse To AMP
From your web browser, go to http://192.168.0.40. You should see the following:
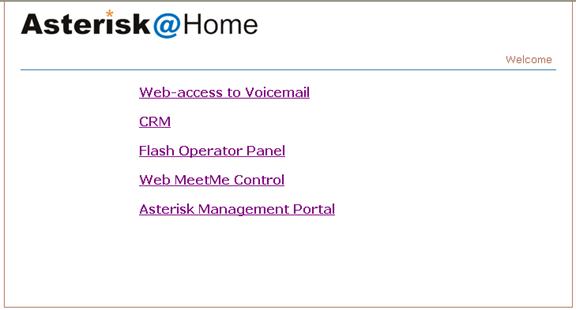
Select “Asterisk Management Portal.” Log in as follows:
|
username: maint |
Now you should be at the AMP main screen.
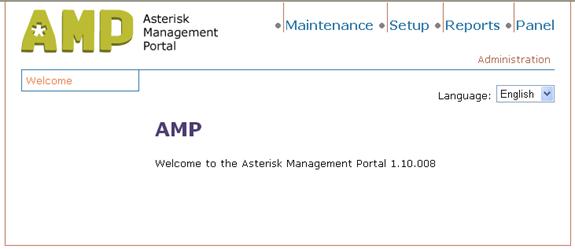
Click on “Setup” to bring you to the main setup screen.
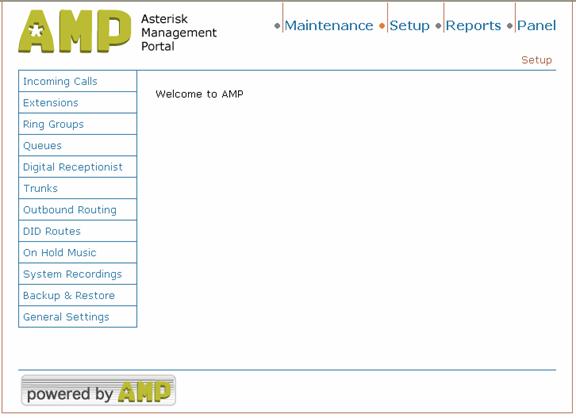
Set Up BroadVoice Trunk
Click on “Trunks” and then “Add SIP Trunk.” You see a blank SIP trunk form.
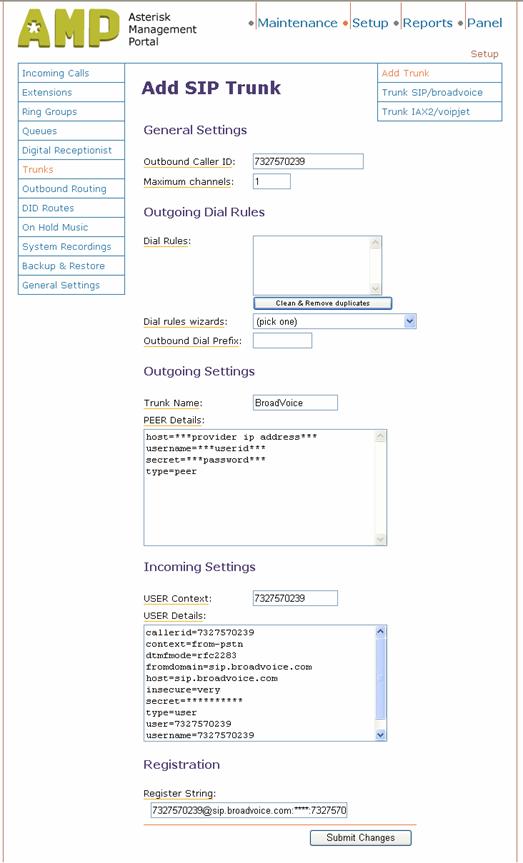
You
will need to fill out the main items on the SIP/Trunk screens. I am
using
BroadVoice for incoming service only, so I will not administer outgoing
trunk
information.
|
Outbound caller ID: 7237570239 |
The
outgoing settings can be left as is, except to fill in the trunk name
as BroadVoice.
In
Incoming Settings, fill in the following:
|
User Context: 7327570239 |
The
format of the Register String is:
username:password:phone_number@provider_domain.
For BroadVoice this
is what you will
want to use (replacing with your BroadVoice phone
number &
password):
|
7327570239@sip.broadvoice.com:**********:7327570239@sip.broadvoice.com/200
|
Once
all of this information is entered, you can click the Submit button. Once you do, a red line
will appear at the top of the page.
To "apply" your changes you must click this red
line (this
will cause AAH to tell the Asterisk engine to reload its config files).
Set
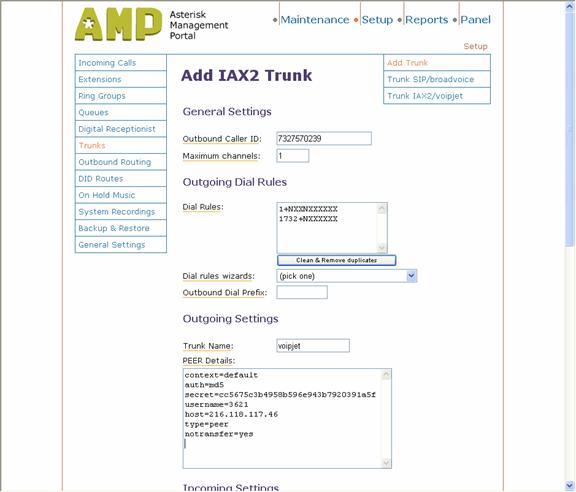
Up VoipJet Trunk
Click on “Trunks” and then “Add IAX2 Trunk.” You see a blank IAX2 trunk form.
Fill
in the fields as follows:
|
Outbound Caller ID:
7327570239 |
The
outgoing dial rules control how numbers are processed before they are
sent to
the trunk. In the
case of VoipJet, phone
numbers must be in the form “1+Area Code+Local
Number”. If the
number appears to have an area code
but not a “1”, then it is added. If
it
does not have an area code, then “1732” is added (I am in area code
732). So the dial
rules are:
|
1+NXXNXXXXXX |
This
time we will fill in outgoing settings.
|
Trunk name:: voipjet |
You can
leave the “Incoming
Settings” and the “Register String” blank.
When you
are done,
the form appears as follows.
Set Up Extensions
Now
it is time to define the extensions.
I
will set up two extensions, number 200 in the basement and number 201
in the
study. I have
already shown how to
configure XLite extension 200, and you can configure another extension
like it
for 201. Or you can
set up a SIP phone
instead.
Click
on “Extensions” on the left, and “Add an Extension.”
You will see the extensions page.
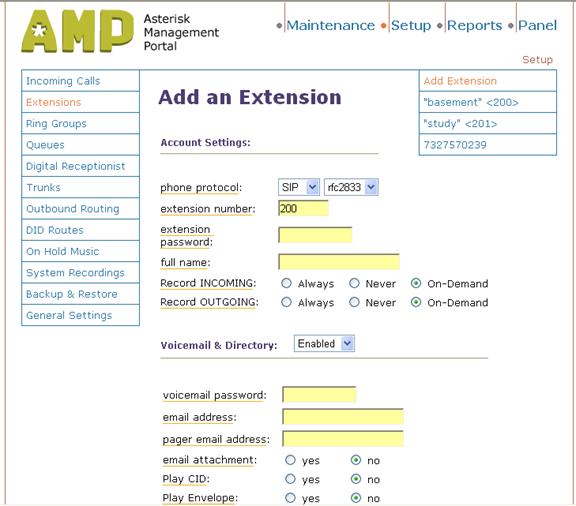
The information you will add is the following:
|
Extension:
200 |
When you're finished adding the extension, you can see the details of the extension by clicking on its name on the right-hand side of the AMP interface (as shown above).
Add extensions 201 similarly. Remember to click on the red bar, to make Asterisk take not of your changes.
Check for Phone Registration
At this point, the XLite application should have registered with AAH. If not, exit XLite (you have to stop it from the tray icon) and restart. It should say “Logged in”. If not, see the troubleshooting section below. To start with, make sure you have assigned the same password in the extension form and in the phone.

On XLite, dial *23 to test audio input and output levels.
Set Up Ring Group
Now we set up a ring group, so that we can ring all the extensions at once. This is useful, for instance, so that incoming calls can alert at all extensions.
On the left, click “Ring Groups” and on the right “Add Ring Group”.
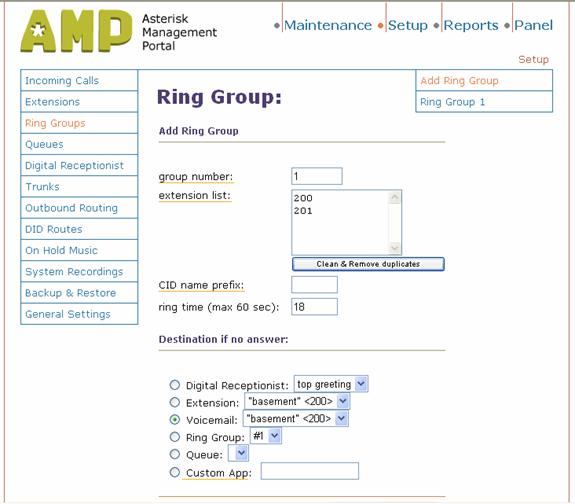
Fill out the form as follows:
|
Group
Number: 1 |
>
Submit the changes, and click the red bar to make them take effect.
Set Up Digital Receptionist
A digital receptionist is an application that answers incoming calls, interacts with callers, and forwards their call on. It allows callers to dial an internal extension, to access the company directory, or to reach selected destinations according to predefined dial patterns. We will set it up to dial by extension, to give the company directory, and to ring all extensions if the caller presses “1”.
The digital receptionist set up involves a series of screens and actions, not all of which will be illustrated. Part of the setup includes recording a message to be played to callers. You can record this independently, and download the MP3 file, or you can use XLite to dial in and make the recording. The latter method will be illustrated. In general, the setup instructions are clear and explicit, so this will only give the essentials.
Click “Digital Receptionist” on the left. Enter 200 as the current extension number. On XLite, dial *77 and record a message. It goes something like this:
Hello.
You have reached Charles Hayden’s experimental Asterisk
phone
system. You can
dial a three digit extension. Dial
1 to ring all extensions
. Or dial pound for a directory.
Hang up and dial *99 to hear the message. Rerecord if necessary.
Name the recording “top greeting” and add a description.
On the next page, for “Number of options for Menu top greeting enter 1.
On the next screen, choose “Ring Group #1” as the action. This means that when the caller enters “1” it will go to Ring Group #1, which rings all extensions.
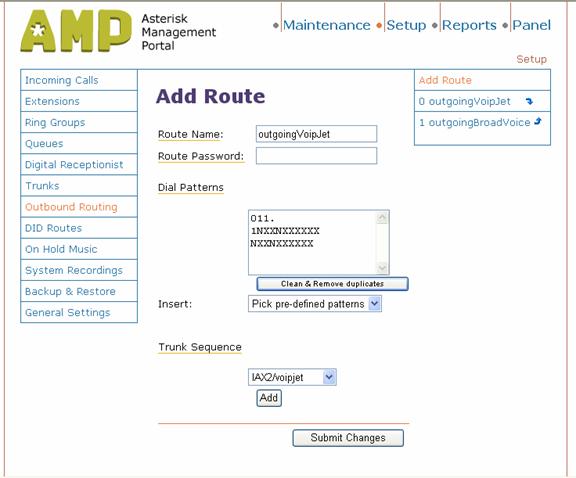
Set Up Outbound Routing
Click on the “Outbound Routing” link and fill in the following:
|
Route
Name: outgoingVoipJet |
The dial patterns given here will allow you to dial
international calls,
long distance with 1+area code, and calls within the 732 area code with
only
the area code but without the 1. This
is
how it works here in the 732 area.
If
you can dial locally without the area code, then you could add “NXXXXXX” as
well. As
we have seen, the trunks cannot
necessarily accept all these dialing combinations, so they have their
own rules
to screen and transform them.
If
you've made it this far you should be able to dial "7777" on your SIP
phone - this will simulate an incoming phone call - and you should hear
your
greeting. At this point the system should have enough functionality to
dial out
through VoipJet.
Go
ahead and call a number and it should ring at the
other end. Remember
that you need to dial 1 followed by a 10 digit number. If it does then pat
yourself on the back! Only a few more steps are
needed to get incoming
calls to work (you can try to call your BroadVoice number, but it won't
work
yet).
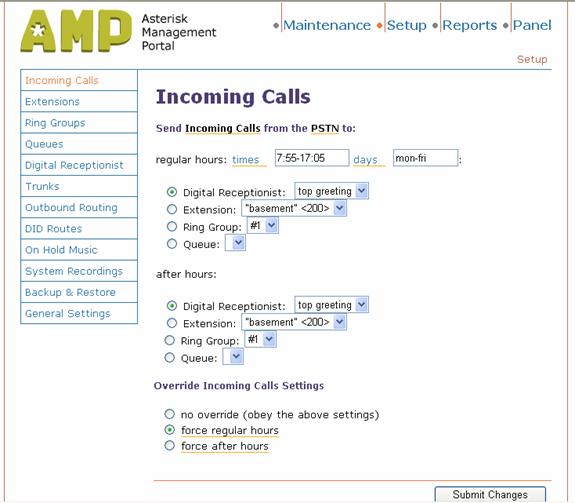
Set Up Incoming Calls
Now we will set up incoming calls to go to the digital receptionist. Choose the “Incoming Calls” link, and click the “Digital Receptionist” “top greeting”.
Edit extensions.conf
So
far we've done everything through the AMP web GUI. Now we have to drop
into
editing text files. This is obviously not desirable, but this is how it
is
right now, so you have to go through this.
You can edit extensions.conf through the AMP web GUI. Click
the Maintenance link at the top of the AMP page
and then click the Config Edit
link in the left-hand menu. Then click on extensions.conf.
Look
on the left for from-sip-external and click it.
By default, AAH sends all incoming SIP calls to a
congestion status.
This means that all incoming calls will ring fast-busy to the caller
and they
will never make it into our AAH system.
There are
four
lines under the [from-sip-external]
section. One is already commented out with a semi-colon (;). Comment
out the
remaining three lines by adding semi-colons. Now we need to add two new
"exten" lines.
The
first is:
|
exten =>
_.,1,Wait(1) |
which
tells AAH to wait for 1 second once a call has
been detected from an external SIP device. This makes sure we don't
clip off
the first part of our greeting message. The second line we need to add
is:
|
exten =>
_.,2,Goto(from-pstn,s,1). |
When
we're done the section should look like this:
|
[from-sip-external]
|
When
you're finished and you've saved your changes, you need to click the
link at
the top of the config edit screen labled
Re-Read
Configs. This will cause
Asterisk to
reload its configuration files and make any changes take effect.
Test Incoming Calls
Now is the moment of truth. If everything went smoothly, you should now be ready to test an inbound call to your AAH system. From a phone (POTS or cell, either will do) dial your BroadVoice number. You should hear your greeting! At this point you'll probably be giddy that it's all working. Go ahead and listen to your greeting a few times (dial 9 to repeat it). Then either dial "1" or your extension and your SIP phone should start ringing. You now have Asterisk@Home configured and working with your BroadVoice account.
Set up Passwords
You need to change the default passwords, so that people do not break into your system. There are a variety of passwords, used for different things.
AMP allows you to assign different login accounts to access the Maintenance section separately from the other sections (Setup, Reports, and Panel). If you log into AMP with the maintenance account, you will be able to access everything, but if you log in with the admin account, you will have to log in also to get to the maintenance section.
|
Username |
Default Password |
Command to Change Password |
Usage |
|
root |
password |
passwd |
log in to console |
|
wwwadmin |
password |
password-amp |
log into AMP GUI, access
Setup, Reports, Panel |
|
maint |
password |
password-maint |
log into AMP Maintenance
section |
|
meetme |
?? |
passwd-meetme |
log into Web Meetme
Control |
|
admin |
password |
passwd admin |
for checking system mail
(Maintenance / Web Mail login) |
To change these passwords, you must log into the console as root, either on the physical console or using a ssh client such as putty (which can be obtained from http://www.chiark.greenend.org.uk/~sgtatham/putty/) from a windows platform or using ssh from a Linux platform.
Troubleshooting
If things did not work the first time, you can track down the trouble using the Asterisk console. This can be used to display SIP messages coming through the system, as well as steps executed in interpreting the dial plan instructions.
If you are more comfortable using Ethereal, you can use that instead (or also) to see the SIP messages. I will not describe how to download or configure it, other than to point out that it can be obtained from http://www.ethereal.com.
To use the Asterisk console, go to the Linux console or enter through ssh. Remember the username is root and the password is password. Give the command:
|
asterisk –vvvvr |
This will attach to the console with verbose mode set. Give the command
|
sip debug |
to enable SIP debugging. You can turn off SIP debugging using the command
|
sip no debug |
Other console commands are summarized at http://www.voip-info.org/wiki-Asterisk+CLI.
Softphone will not register
XLite registers by sending a REGISTER message, which is challenged. It then sends another REGISTER with credentials, which is accepted. If you do not see these REGISTER messages, then XLite proxy setting is probably not right. If you see the challenge but it still rejects the REGISTER with credentials, the passwords are probably mismatched. The password abc123 should be used in both places. Also, be sure the phone “Authorization user” is set to 200.
Outgoing calls
If you are having trouble making outgoing calls, check the username and secret in the IAX2 trunk. Make sure you can ping the host address listed there. The username is a 4 digit number that you find from your account settings on VoipJet.
On a message trace, you should see an INVITE going out, followed by receipt of TRYING and OK (when the far end answers). If there is no response, then perhaps you have the wrong IP address. If the INVITE is immediately followed by a 4XX or 5XX error, maybe the username or password is wrong.
Incoming calls
If the incoming BroadVoice trunk is set up properly, Asterisk will register successfully, and will renew the registration every 10 seconds. Look for an outgoing REGISTER, a challenge, another outgoing REGISTER with credentials, and an incoming 200 OK. If you get no response, or either REGISTER yields an error reply, then look at the host, secret, and user fields from the SIP trunk.
If the REGISTER succeeds, then when you call (from a POTS phone) you should see an INVITE being received. If you have not properly changed extensions.conf, then the system will reply with an error rather than with TRYING. Look at the debug output to see how the INVITE is being processed. You should see the Wait and the GoTo that you entered into extensions.conf. If you see these, and the call is still not answered, you might want to change Incoming Calls to route the call to a specific phone, for instance to “basement <200>”. This will bypass the Digital Receptionist and the Ring Group for now. If this fixes things, look at those two screens. If not, make sure the “context=from-pstn” is present in the incoming trunk user details. If this still does not fix things, you will have to follow the trace as it steps through the contexts and steps in extensions.conf.
More
This section describes some things you might want to do to further customize your system. I am experimenting myself, and presenting the results here. These instructions might not be the most effective way to achieve the desired results. If you find a better way, please let me know. The instructions in this section are briefer, reflecting your increased level of experience with AAH.
Weather for external callers
You can modify the digital attendant so that it can read the weather to callers. Remember to modify your digital attendant announcement recording if desired (“press 2 for weather”).
- Modify the Digital
Receptionist. For
“Number of options” give “2”. On
the next screen, for option 2, give “Custom App” and enter
|
custom weather,s,1 |
- Go into “Maintenance”, “Config Edit”, “extensions_custom.conf”. At the end, add:
|
[custom-weather] |
You can customize the weather for your own city be editing /var/lib/asterisk/agi-bin/weather.agi. You need to edit $custpath and $filename. Don’t forget to modify the announcement a few lines down. You can ftp to weather.noaa.gov and cd to data/forecasts/city to see the state/city combinations that are available.
Outgoing BroadVoice
You can set up the BroadVoice trunk to carry outgoing calls. Since you get 100 “free” minutes per month, you might want to use these up first, before switching over to VoipJet. It would be great if the system could do this for you, but for now there is no easy way to do this. So instead, let’s up a dial-9 trunk for BroadVoice.
- Open the
BroadVoice trunk. Add
“Peer Settings” of:
|
allow=ulaw |
- Go to “Outbound
Routing”. Add a new
route. Name it
“outgoingBroadVoice.” Add
the following dial patterns. These
mimic the local dialing rules, which permit “1” followed by a ten digit
number, or “732” followed by a seven digit number.
An initial “9“ selects
the broadvoice trunk, but it is stripped off before the number is
dialed.
|
9|1NXXNXXXXXX |
Set the “Trunk sequence” to SIP/broadvoice.”
Set Up Voice Mail
By default, when you set up an extension, and add an email address in the “email address” field, then when the system records a message, it sends email containing a link that will let the recipient listen to the voice message on their computer (through the browser). For this to work, you must open up your Asterisk machine to browser traffic from outside the router’s firewall. I leave it to the reader to figure out this one.
Once you do, you still need to change the email, which contains a link to the mail reading web page.
- Go to “Maintenance” and then “Config Edit” and choose “vm_email.inc”.
- Replace the string “192.168.1.101” with the external name or IP address of your Asterisk system. In other words, you need to form a URL that can be used to browse to the Asterisk system from where you will be reading the mail, which is probably outside your NAT router.
- After you click “Update” do not forget to select “Re-Read Configs”.
- Test it by calling extension 200, leaving voice mail, receiving the email, and following the link.
- You will be prompted to log in. Use extension number 200, and its password “1234”. You can then retrieve and listen to the email.
You may notice a few things wrong
with the voice mail reader
application. I
guess this means that it
is not really finished, although it appears to basically work. I noted that the initial
login does not fill
in your extension, as it should. Also
the image links are broken. Maybe
the
next version will clean up these details.
Add Free World Dialup IAX Trunk
 Free
World Dialup (FWD, at http://www.freeworlddialup.com/)
is a free VoIP service provider. Using
it, you can call other FWD users, and through cooperative arrangements
with
other service providers, subscribers on many other VoIP networks. In addition, you can use
their gateways to
call to the PSTN (but only toll free numbers, since someone still has
to pay
for other kinds of calls).
Free
World Dialup (FWD, at http://www.freeworlddialup.com/)
is a free VoIP service provider. Using
it, you can call other FWD users, and through cooperative arrangements
with
other service providers, subscribers on many other VoIP networks. In addition, you can use
their gateways to
call to the PSTN (but only toll free numbers, since someone still has
to pay
for other kinds of calls).
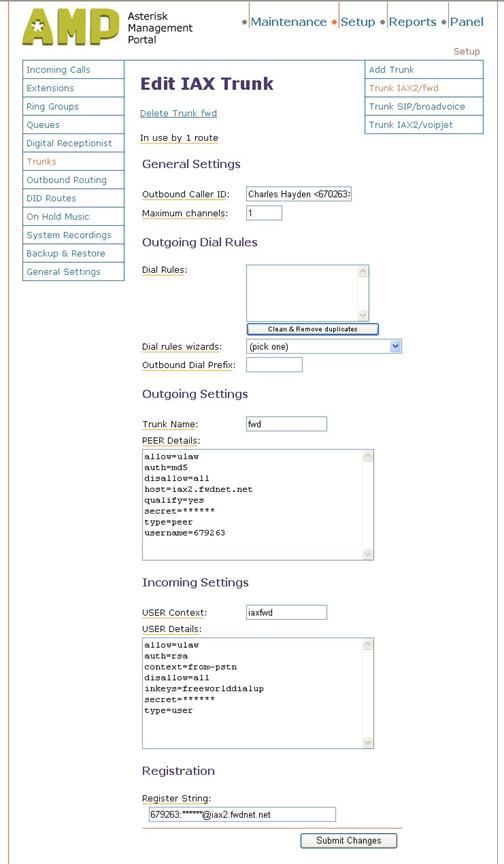
You first need to sign up for a FWD “phone number,” which you can do at the web site listed above. Be sure to enable IAX service while you are there. My number is 679263. I will use this in the examples below, but you should replace it with your own number and password, as appropriate.
- Open the Trunks
page, select “Add Trunk” and select “Add IAX2 Trunk”.
Enter the following information.
I have chosen to use a prefix of “393” (FWD) to select
the FWD trunk. You
can pick a different trunk prefix if you want.
|
Outbound Caller ID:
Charles Hayden <679263> Trunk Name: fwd allow=ulaw auth=md5 disallow=all host=iax2.fwdnet.net qualify=yes secret=<your FWD
password> type=peer username=679263 USER Context: iaxfwd USER Details: allow=ulaw auth=rsa context=from-pstn disallow=all inkeys=freeworlddialup secret=<your FWD
password> type=user Register String: 679263:<your FWD
password>@iax2.fwdnet.net |
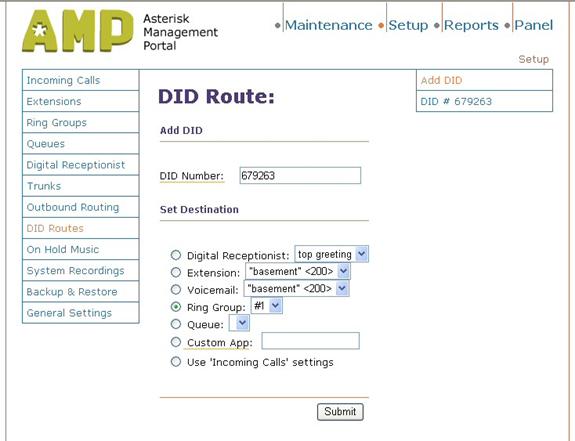
- Open the “DID
Routes” page, and select “
|
DID Number: 679263 Ring Group: #1 |
- Open the “Outbound
Routing” page and select “
|
Route Name: outgoingFWD Dial Patterns: 393|. Trunk Sequence: IAX2/fwd
|
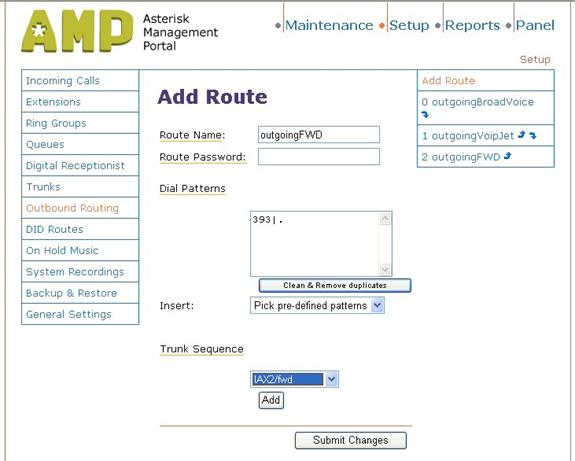
After you submit and apply these changes, you can go to the “Maintenance/Asterisk Info” page and check the IAX2 Sip Registry and the IAX2 Peers. These should both show the trunk you set up with State Registered and Status OK. You can test FWD by dialing “393612” to hear the time. You can make an incoming call to your Asterisk system using the FWD page that used to sign up for IAX service.
ArtDio
There are many choices for phones that you can use with the Asterisk system. Among the possibilities are IAX phones, SIP phones, SIP softphones, and analog phones with a SIP/analog converter. Such a converter should provide a FXO interface. Sources of phones and converters are listed below.
 I
purchased some ArtDio
phones, since they were the
least expensive SIP phones I could find.
Adding new extensions for the phones is straightforward –
just like the
others. Administering
the phone itself
was a little more difficult.
I
purchased some ArtDio
phones, since they were the
least expensive SIP phones I could find.
Adding new extensions for the phones is straightforward –
just like the
others. Administering
the phone itself
was a little more difficult.
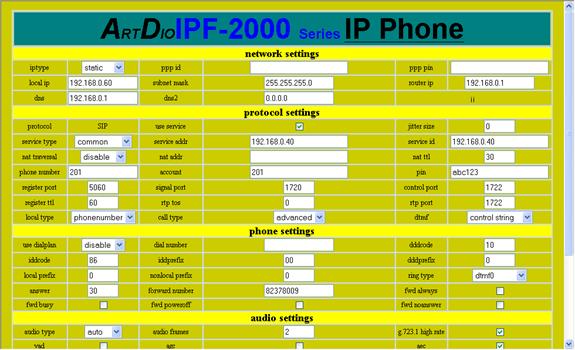
The procedure for setting up the phone consisted of two steps.
- Plug the phone in, log on to it, and set its IP address, net mask, and default gateway parameters.
- Browse to the phone and set up its SIP gateway, its name and password, and other SIP parameters. You will know these are right when the phone can register. In the case of the ArtDio phone the critical step was knowing that there were two passwords, and that only the “super user” password (“12345678”) would allow access to the key SIP configuration parameters.
- The fields that I had to change on the ArtDio are as follows (assuming the extension is 201 and the IP address of the phone is 192.168.0.60):
|
Use service: checked Service id: 192.168.0.40 |
If you do not see the screen below when you browse to the phone’s IP address, but instead see a simpler screen, then it means that you have logged in with the phones user password, not its superuser password.
Sipura
 Once
I had a few phones set up, I realized that there are places in my home
where I
wanted a phone, but where I did not have Ethernet wiring. There are several ways to
address this:
Once
I had a few phones set up, I realized that there are places in my home
where I
wanted a phone, but where I did not have Ethernet wiring. There are several ways to
address this:
- rewire my house, putting Ethernet jacks all over
- use an analog phone adapter and set up cordless phones as extensions
- get WiFi SIP phones, used in conjunction with my existing wireless infrastructure
- use an analog phone adapter and existing phone wiring and phones
The simplest, least expensive, and least disruptive choice was to use an analog phone adapter with a cordless hone. The Sipura adapter is widely available on eBay. It was distributed by various IP telephony service providers. I guess people who tried it and did not like it are selling their used adapters. Just make sure you get one that is “unlocked”. Apparently Vonage adapters are set up so that you cannot modify the critical SIP parameters, and are not usable with Asterisk. Other service providers such as BroadVoice, do not lock their devices.
I bought a used Sipura SPA-2002. I have also tried this with a Sipura 1000 and it works about the same. Setting it up was pretty easy.
1. Set up an extension, as before, in the AMP Setup/Extensions screen.
2. Plug it into Ethernet and connect a phone. When you apply power, it gets an IP address from DHCP.
3. You need to get the IP address. Pick up the phone, dial “****” and then dial “110#”. It will speak the IP address.
4. Browse to the address as follows: http://<ip_addres>/admin/advanced
5. If you have purchased a used unit, it would be a good idea to clear out any old settings first. On Sipura devices, you can do a factory reset by:
a. Dial “****” and verify that you hear a voice prompt.
b. Dial “RESET#” (73738#).
c. Dial “1” to confirm.
6.
On
the “System” tab, enter the fixed IP address
you want to assign the device.
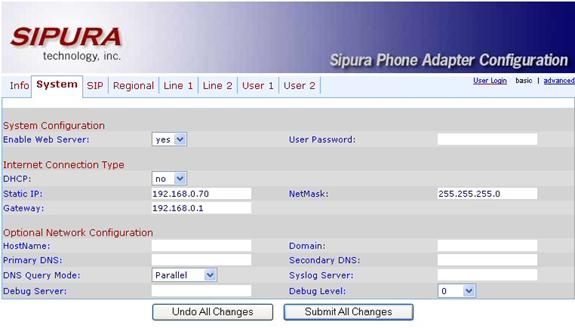
When you are done, submit the changes.
7.
Using
the new IP address, browse to the advanced
admin screen again. This
time, select
the “Line1” tab. Enter
the proxy
information (the IP address of the Asterisk system) and the subscriber
information (the extension number and password you set up in step 1).
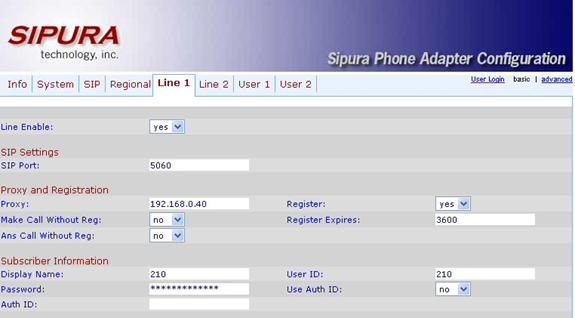
You should be able to use the phone at this point.
Go to AMP’s Maintenance/Asterisk Info screen
to check that the new extension is registered.
Router
 Once
you have your system set up and are using it for phone service, you may
notice
that the sound quality is terrible when you are doing other things on
your
broadband connection, such as large FTP transfers.
This depends a lot on your connection
speed. In my case,
which I imagine is
pretty common these days, I have only 128K bits per second uplink speed. For comparison, with the
standard G711 coder,
one phone call takes 64K bits, half the bandwidth.
Unless you do something, FTP will take enough
bandwidth to make telephone calls impossible.
What can you do about this
? Your
router may be able to help, by giving
traffic coming to and from the Asterisk box priority. I have a Linksys WRT54G, a widely
available combo router, 4 port
switch, and wireless access point.
It
has a way to assign priority to different traffic in various ways. I set it up to give
priority to a given
switch port, where I have the Asterisk system plugged in.
Once
you have your system set up and are using it for phone service, you may
notice
that the sound quality is terrible when you are doing other things on
your
broadband connection, such as large FTP transfers.
This depends a lot on your connection
speed. In my case,
which I imagine is
pretty common these days, I have only 128K bits per second uplink speed. For comparison, with the
standard G711 coder,
one phone call takes 64K bits, half the bandwidth.
Unless you do something, FTP will take enough
bandwidth to make telephone calls impossible.
What can you do about this
? Your
router may be able to help, by giving
traffic coming to and from the Asterisk box priority. I have a Linksys WRT54G, a widely
available combo router, 4 port
switch, and wireless access point.
It
has a way to assign priority to different traffic in various ways. I set it up to give
priority to a given
switch port, where I have the Asterisk system plugged in.
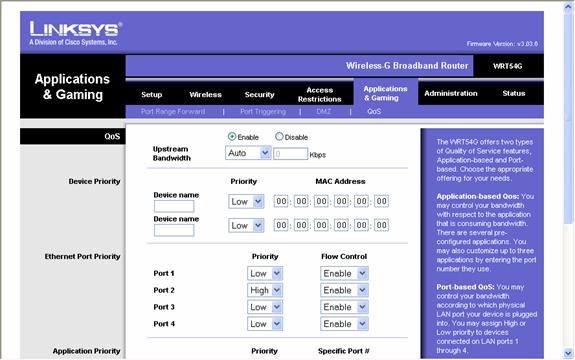
To set this up, browse to your router, log in, and go to “Applications and Gaming” and then to “QoS”. I plugged my Asterisk system into port two, so I set up:
|
QoS: |
Next
The AAH
people have provided you with a ton of
pre-configured features. You can start reading through the main
configuration
files to see some of the cool things you can do with AAH and your
BroadVoice
and VoipJet accounts. You might want to set up the BroadVoice trunk to
do
outgoing calls, using a prefix. It
would
be nice if it could use BroadVoice for outgoing calls until the 100
minutes are
used up, then switch to
VoipJet. If you
figure out how to do this, let me
know.
You
can make a backup of your configuration files by backing up the files
in the /etc/asterisk directory of your AAH server. The
AMP “Backup” command on the left can be used
to set up periodic backups.
If
you are interested in making international calls, add some more
patterns in “Outbound
Routing”.
Commonly used dial patterns are
preconfigured, so you only have to select them.
Read
through the extensions.conf
and see what all is already configured for you to test and work with.
Further Reference
Here
are some places to go to find out more about AAH, Asterisk, and the
components
that make it up.
Service Providers
BroadVoice http://broadvoice.com
VoipJet http://voipjet.com
VoicePulse http://connect.voicepulse.com
TelaSip http://www.telasip.com/index.html?PARTNER=coupon4voip
Free World Dialup http://www.freeworlddialup.com
LibreTel http://www.libretel.com
Software
Asterisk@Home and Asterisk:
Asterisk@Home http://asteriskathome.sourceforge.net/
Asterisk http://www.asterisk.org/
Asterisk@Home Handbook http://asteriskathome.sourceforge.net/handbook
Asterisk@Home support http://www.voip-info.org/tiki-index.php?page=Asterisk+at++Home
Asterisk Support http://www.voip-info.org/tiki-index.php?page=Asterisk
Asterisk@Home info http://geekgazette.com/index.php?option=com_frontpage&Itemid=1&limit=4&limitstart=8
AMP (Asterisk Management Portal)
AMP Home http://amp.coalescentsystems.ca/
FOP (Flash Operator Panel)
FOP Home http://www.asternic.org/
Sugar CRM
What it is and how to set
it up http://www.sugarcrm.com/home
CentOS
A free enterprise OS http://centos.org
Phones
XLite http://xten.com/index.php?menu=products&smenu=xlite
SipXPhone http://www.sipfoundry.org/sipXphone/index.html
Tools
Ethereal http://www.ethereal.com
Putty http://www.chiark.greenend.org.uk/~sgtatham/putty/
Phones
Buy phones http://www.voiplink.com/
Buy phones http://www.voipsupply.com/
Buy phones https://www.thevoipconnection.com/
Buy Phones http://store.sipphonestore.com/
XLite softphone http://www.xten.com/
SNOM phones http://www.snom.com/phones.html?&L=1
ArtDio phones http://www.artdio.com.tw/en/ipf.htm
Grandstream phones http://www.grandstream.com/y-product.htm
Cisco phones http://www.cisco.com/en/US/products/hw/phones/ps379/
Avaya phones http://www.avaya.com/gcm/master-usa/en-us/products/offers/4600_series_ip_telephones.htm&View=ProdTechSpec
Acknowledgements
A preliminary version of this set of instructions was produced by Jacob Cazell (http://www.cazz.org/). It helped immensely in getting my own system set up properly the first time, and inspired this document. A few of the sections here incorporate material that first appeared there.
I will be adding to these instructions from time to time as I experiment with additional features, service providers, and subsequent releases. If you have suggestions, corrections, or comments on these instructions, I welcome your feedback. Please send commands to cchayden@gmail.com
Appendix 1 – Feature Codes
|
*411 |
Directory |
|
*43 |
Echo Test |
|
*60 |
Time |
|
*61 |
Weather |
|
*62 |
Schedule wakeup call |
|
*65 |
Festival test (your extension
is XXX) |
|
*69 |
Last Called ID |
|
*70 |
Activate Call Waiting
(deactivated by default) |
|
*71 |
Deactivate Call Waiting |
|
*72 |
Call Forwarding System |
|
*73 |
Disable Call Forwarding |
|
*77 |
IVR Recording |
|
*78 |
Enable Do-Not-Disturb |
|
*79 |
Disable Do-Not-Disturb |
|
*8 |
Pickup |
|
*90 |
Call Forward on Busy |
|
*91 |
Disable Call Forward on Busy |
|
*97 |
|
|
*98 |
Enter |
|
*99 |
Playback IVR Recording |
|
666 |
Test Fax |
|
700 |
Park |
|
7777 |
Simulate incoming call |
|
888 |
Barge In |
Appendix 2 – Asterisk CLI commands
This is a selected summary of the
Asterisk CLI
commands. These
commands can be entered
on the Asterisk console, which you access by running:
|
asterisk –r |
General commands
!<command>:
Executes a given shell command
abort halt: Cancel a
running halt
add extension: Add new
extension into context
add ignorepat: Add new
ignore pattern
add indication: Add the
given indication to the country
debug channel: Enable
debugging on a channel
dont include: Remove a
specified include from context
help: Display help list, or specific help
on a command
include context: Include
context in other context
load: Load a dynamic module by name
logger reload: Reopen log
files. Use after rotating the log
files.
no debug channel:
Disable debugging on a channel
pri debug span: Enables
PRI debugging on a span
pri intense debug span:
Enables REALLY INTENSE PRI debugging
pri no debug span:
Disables PRI debugging on a span
remove extension: Remove a
specified extension
remove ignorepat: Remove
ignore pattern from context
remove indication: Remove
the given indication from the country
save dialplan: Overwrites
your current extensions.conf file with an exported version based on the
current
state of the dialplan. A backup copy of your old extensions.conf is not
saved. The initial values of global variables defined in the [globals]
category
retain their previous initial values; the current values of global
variables
are not written into the new extensions.conf. Using "save dialplan"
will result in losing any comments in your current extensions.conf.
set verbose: Set level of
verboseness
show agents: Show status
of agents
show applications: Shows
registered applications
show application: Describe
a specific application
show channel: Display
information on a specific channel
show channels: Display
information on channels
show codecs: Display
information on codecs
show conferences: Show
status of conferences
show dialplan: Show
dialplan
show image formats:
Displays image formats
show indications: Show a
list of all country/indications
show locals: Show status
of local channels
show manager command: Show
manager commands
show manager connect: Show
connected manager users
show parkedcalls: Lists
parked calls
show queues: Show status
of queues
show switches: Show
alternative switches
show translation: Display
translation matrix
soft hangup: Request a
hangup on a given channel
show voicemail users: List
defined voicemail boxes
show voicemail zones: List
zone message formats
Server management
restart gracefully: Restart
Asterisk gracefully
restart now: Restart Asterisk
immediately
restart when convenient:
Restart Asterisk at empty call volume
reload: Reload configuration
stop gracefully:
Gracefully shut down Asterisk
stop now: Shut down
Asterisk immediately
stop when convenient: Shut
down Asterisk at empty call volume
extensions reload?: Reload
extensions and only extensions
unload: Unload a dynamic module by name
show modules: List modules
and info about them
show uptime: Show uptime
information
show version: Display
Asterisk version info
AGI commands
show agi: Show AGI
commands or specific help
dump agihtml: Dumps a list
of agi command in html format
Database handling commands
database
database deltree: Removes
database keytree/values
database get: Gets database
value
database put: Adds/updates
database value
database show: Shows database
contents
IAX Channel commands
iax2 debug: Enable IAX
debugging
iax2 no debug: Disable IAX
debugging
iax2 set jitter: Sets IAX
jitter buffer
iax2 show cache: Display
IAX cached dialplan
iax2 show channels: Show
active IAX channels
iax2 show peers: Show
defined IAX peers
iax2 show registry: Show
IAX registration status
iax2 show stats: Display
IAX statistics
iax2 show users: Show
defined IAX users
iax2 trunk debug: Request
IAX trunk debug
iax debug: Enable IAX
debugging
iax no debug: Disable IAX
debugging
iax set jitter: Sets IAX
jitter buffer
iax show cache: Display
IAX cached dialplan
iax show channels: Show
active IAX channels
iax show peers: Show
defined IAX peers
iax show registry: Show
IAX registration status
iax show stats: Display
IAX statistics
iax show users: Show
defined IAX users
init keys: Initialize RSA
key passcodes
show keys: Displays RSA
key information
SIP channel commands
sip debug: Enable SIP
debugging
sip no debug: Disable SIP
debugging
sip reload: Reload
sip.conf
sip show channels: Show
active SIP channels
sip show channel: Show
detailed SIP channel info
sip show inuse: List all
inuse/limit
sip show peers: Show
defined SIP peers (clients that register to your Asterisk server)
sip show registry: Show
SIP registration status (when Asterisk registers as a client to a SIP
Proxy)
sip show users: Show
defined SIP users